Help / ICC Profiles
Preamble
PICTO Online automatically manages the ICC profiling of your files, without any additional retouching or color correction if you select "Image Optimization: Client Settings".
If you are not familiar with ICC profiles, we recommend letting Picto Online handle the color conversion with confidence; the result will be optimal.
For ICC enthusiasts, PICTO’s automatic profiling mode is based on a "perceptual" rendering intent.
If you prefer a different color rendering intent, you can profile your file before uploading it. Your chosen rendering intent will be preserved: for example, "relative colorimetric with black point compensation," especially in the case of a conversion from a CMYK space (Fogra type) to an RGB space (silver halide or pigment inkjet printing). To do this, use the process/media profiles we make available to you on each service presentation page.
Recommended book on this topic: Color Management Step by Step, by Jean Delmas.
Our Black and White ICC profiles are specifically designed for these types of services and are available to help you optimally prepare your future Black and White prints. Their use is particularly recommended for soft-proofing the final print rendering, but they can also be used for conversion, allowing you to convert a color image to black and white while preserving maximum information.
The profiles we provide are the same ones our print technicians use daily for all printing and photo printing services performed by PICTO. These profiles are based on calibrations checked and corrected several times a day by our technicians.
How to Calibrate My Screen?
To fully benefit from viewing your images using our ICC profiles, we encourage you to use a high-quality, semi-professional or professional monitor with a wide color gamut, a uniform panel, and ideally hardware calibration or at least a calibration device.Here are our printing-specific recommendations, divided into two scenarios:
Case #1 / Practical Evaluation*:
Your images are intended for printing, and you have office-type ambient lighting for practical observation of prints. The recommended settings are:
- Color Temperature: D50; 5,000 K, +/- 500 K
- Gamma 2.2
- Luminance 90 cd/m2, +/- 10 cd/m2
- Print observation lighting: 500 lux, +/- 125 lx
Case #2 /Critical Comparison:
Your images are intended for printing, and you have standardized professional print evaluation equipment (e.g., JUST Normlicht station). We recommend the following settings:
- Color Temperature: D50; 5,000 K, +/- 500 K
- Gamma 2.2
- Luminance 120 cd/m2, +/- 10 cd/m2
- Print observation lighting: 2000 lux, +/- 500 lx (P1 condition, compliant with international standard ISO 3664:2009).
Important:
These recommendations are adapted to our viewing conditions based on ISO 3664 and ISO 12646 standards.
Your monitor calibration should closely match your print viewing conditions and may need adjustment (Color Temperature, Luminance).
You’ll find more information and guidance on configuring your viewing setup in the following section: "ISO 3664 and ISO 12646 Viewing Conditions: Screen and Light Table".
If you decide to change your monitor's current settings, we recommend resetting all monitor adjustments (factory settings) before starting a new calibration procedure.
Make sure to enable automatic monitor adjustments during the calibration process.
For reference, PICTO’s graphics workflow primarily uses EIZO monitors (integrated sensor, managed via ColorNavigator software).
Should I Profile?
You are free to manage ICC conversion yourself, it is not mandatory.
If you are unsure or unable to profile, Picto Online will automatically handle the ICC conversion. You just need to ensure your working space profile is embedded in your file.
IMPORTANT: For converting a CMYK file (such as Fogra 39L or ISO 12647-2) to an RGB process (silver halide or pigment printing), we recommend performing the conversion manually before sending your file, rather than using automatic conversion.
Files Without ICC Profiles
If your file does not have an ICC profile or its profile is unrecognized, "XXX without profile" will appear in red. This indicates that automatic conversion for your print will follow the default procedure:
| RGB without profile | Assign sRGB profile, then convert to the selected output profile |
| CMYK without profile | Assign ISOcoated_v2_300_eci (Fogra 39L), then convert to the selected output profile |
| Grayscale without profile | Assign Gray Gamma 2.2, then convert to the selected output profile |
If your color spaces do not match the default procedure, your prints or reproductions may not produce the expected results.
We recommend reviewing your files to ensure they have an embedded and recognized profile, then upload them again.
The embedded profile should display in the cart (e.g., Adobe 98 or sRGB, etc.). If “XXX no profile” still appears, please contact us at serviceclient@PictoOnline.fr.
Which ICC profile should I choose?
PICTO’s ICC profiles are created taking into account 4 data points:
- The imaging device or printer
- The inks or dyes used
- The selected paper or printing medium
- Our calibration
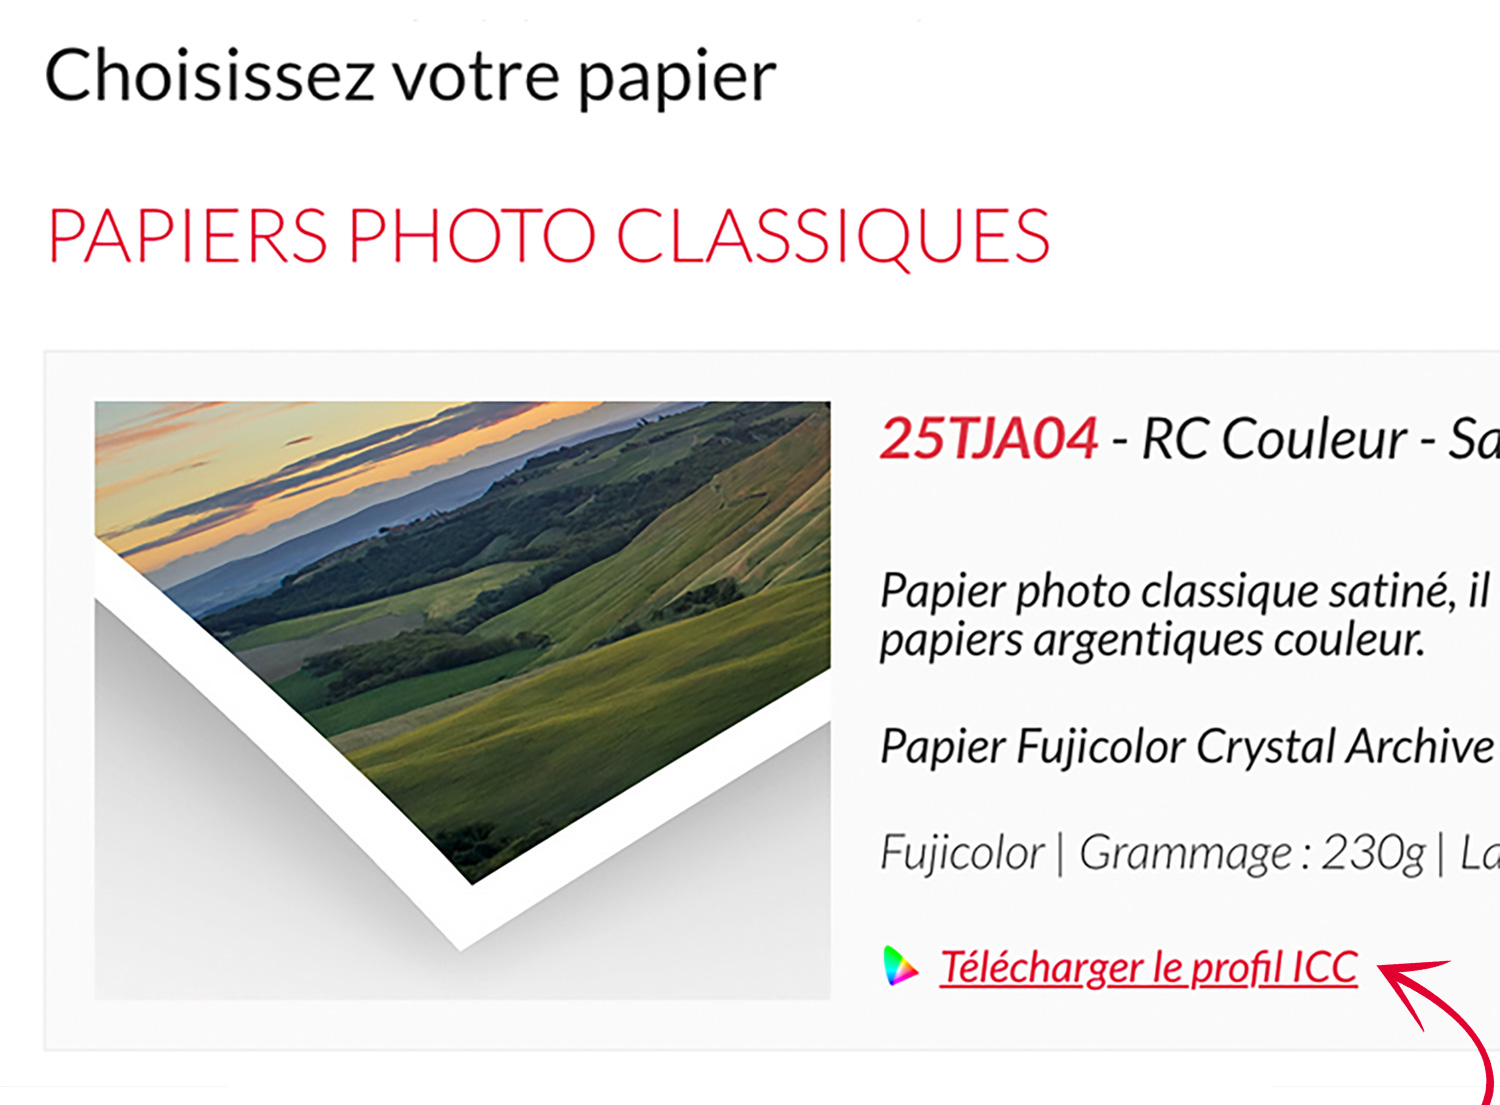
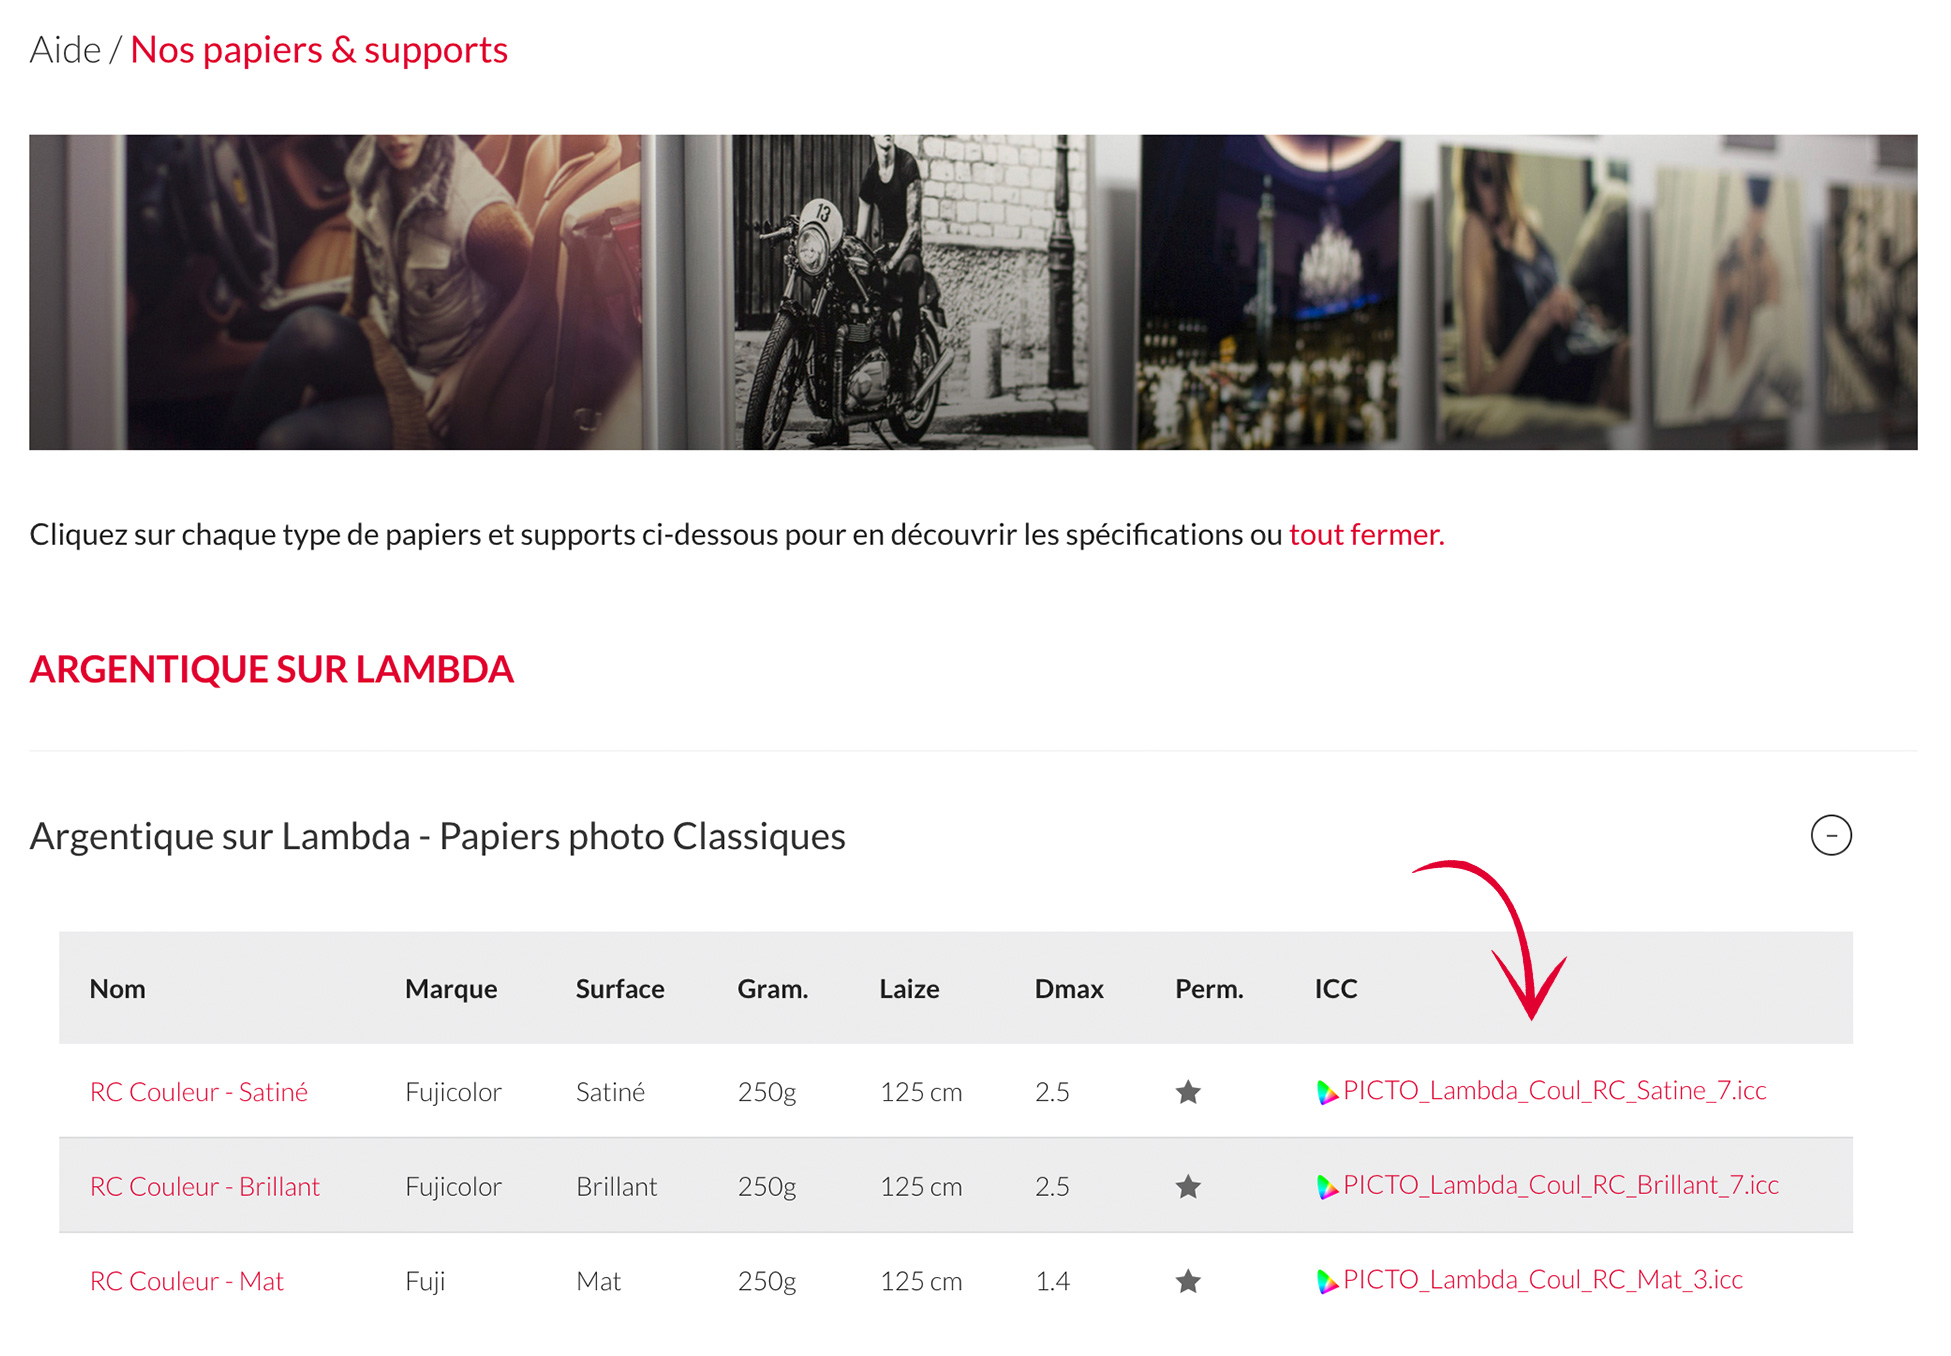
We therefore recommend using the profile that exactly matches the paper/medium for your chosen service.
The profiles can be downloaded directly from each service presentation page, next to the thumbnails of each paper/medium.
The profiles provided by PICTO are either created in-house or by standardization committees when standards are established at the European or global level.
About Black and White:
To achieve better results, our Black and White ICC profiles, also available for download (excluding Piezo Carbon services), are specifically designed to help you prepare your prints.
Your image can remain in its original color space. A proof simulation in Adobe Photoshop or Lightroom will then be possible to preview the final rendering.
You can also convert your image to black and white using our specifically adapted profiles.
We strongly advise against using the following ICC profiles, which are unsuitable for photographic rendering: Dot gain 10%, Dot gain 15%, Dot Gain 20%, Dot Gain 25%, Dot Gain 30%, Gray Gamma 1.8.
How to install ICC profiles?
After downloading and extracting, you must copy the profile file (*.icc extension) into a specific folder depending on your Mac or PC environment.
| MAC | If your system drive is named Macintosh HD: (If not, replace Macintosh HD with the name of your system drive) Copy to: Macintosh HD/Library/ColorSync/Profiles (or each user’s Library folder) |
| PC | If your system drive is named C:/ (If not, replace C:/ with your system drive letter) Copy to: C:/WINDOWS/system32/spool/drivers/color |
TIP: You can also install a profile simply by right-clicking the file and selecting “Install Profile.”
How to use ICC profiles?
The instructions below apply to Adobe Photoshop and Adobe Lightroom. For all other software, please refer to their documentation. This simulation is accurate if you have a regularly calibrated monitor, especially if it is a “Wide-Gamut” monitor.
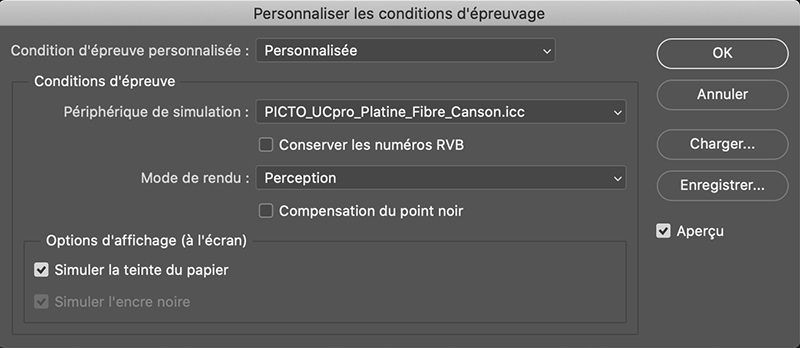
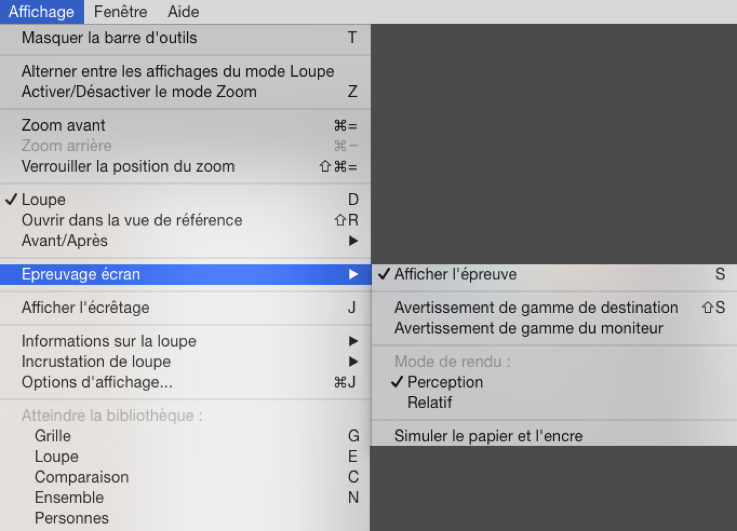
1. Adobe Photoshop: Previewing conversion with the menu “View / Proof Setup / Custom” (Softproofing)
You want to preview or make corrections by simulating the final output on the selected medium while keeping the original profile (no ICC conversion of the file) and letting Picto Online handle automatic conversion:
- In the Photoshop menu bar: View > Proof Setup > Custom
- In Simulation Device, select the desired ICC profile
- Select Rendering Intent (Perceptual)
- Check Preview
- Check Simulate Paper Color in Display Options (On-Screen) to better reproduce the paper’s look during simulation. This is particularly useful for papers with a matte black (a black density not exceeding a Dmax of 1.8). For example, RC Matte photographic paper, certain fine art matte papers, or Japanese papers.
You can save your simulation. In the example shown, you can name this simulation: PICTO_Epson-Ultrachrome-Platine-Fibre-Canson.
The simulation is now active; you can check the final rendering of your image on your screen and make corrections if needed using adjustment layers:
- => “Layers”
- => “New Adjustment Layer”
- => “Curves, Levels, Hue/Saturation, …”
Once the corrections are applied (“Layers” => “Flatten”), save your optimized image for printing without performing an ICC conversion.
We recommend keeping your original file (with the adjustment layers) and saving a separate print version of your image for Picto Online.
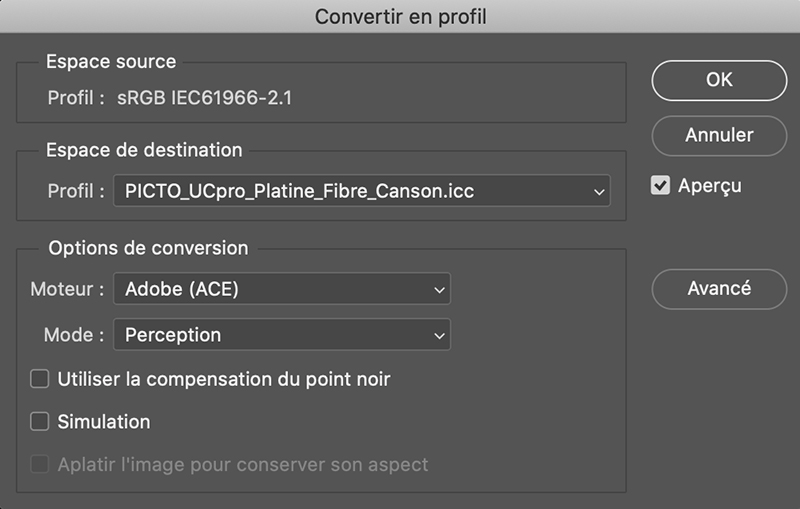
2. Adobe Photoshop: Viewing and converting to our ICC profiles via the “Edit / Convert to Profile” menu
You want to convert your image from your color space (Adobe 98, sRGB, etc.) to PICTO’s color space using our ICC profiles, to preview the rendering in the automatic mode used by our workflow:
- In the Photoshop menu bar: Edit > Convert to Profile
- A Convert to Profile dialog box opens to configure the conversion:
- The installed PICTO profiles should appear in the dropdown menu. Choose the Destination Space by selecting the printer/imager+medium profile you want to use.
- In Conversion Options, select:
The Source Space is either your working space as configured, or the embedded profile in your original file. In this example, it is the sRGB IEC61966-2.1 profile.
- => Engine: Adobe (ACE)
- => Intent: Perceptual
If you don’t perform conversion on your files, PICTO Online uses “Perceptual” mode by default. If you notice significant differences, choose conversion in another mode.
If the conversion looks correct or you make adjustments, when saving your file you must keep the embedded ICC profile for Picto Online printing. The final printed result will closely match this preview.
3. Adobe Lightroom: Previewing the Conversion
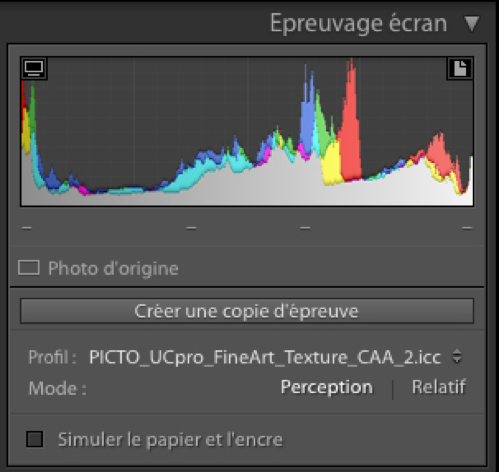
Important: ICC profile management in Lightroom is done from the "Print" menu and then in the "Color Management" section.
The term "Profile Browser" found in the "Develop" menu is incorrectly named, as it does not correspond to ICC profile management but rather to color presets offered by the software.
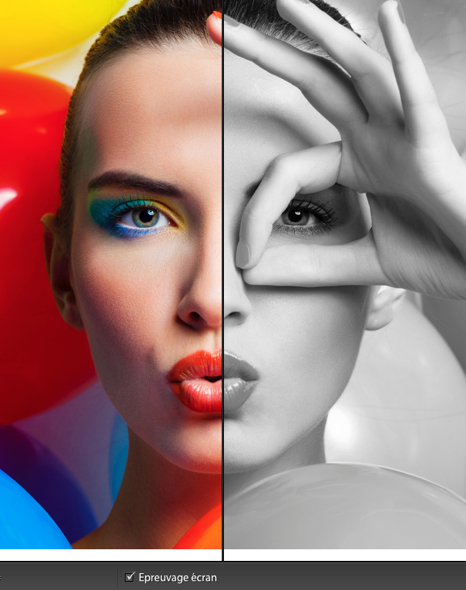
- To simulate the final print rendering of your image, click on the "Develop" section of the software.
- Select the "Soft Proofing" menu from the "View" menu and choose
- "Show Proof"
- "Rendering Intent: Perceptual"
- If you want to simulate the final rendering of a print using matte black (whose black density does not exceed a Dmax of 1.8), especially for Fine Art papers, you must select "Simulate Paper and Ink".
- A Soft Proofing window will prompt you to choose the desired ICC profile for screen simulation, and "Simulate Paper and Ink" must be checked.
- The Lightroom simulation allows you to see a before/after preview of the conversion. If the preview does not suit you, you will need to go back to make the necessary corrections.
- A Soft Proofing window will prompt you to choose the desired ICC profile for screen simulation.
4. Adobe Lightroom: Converting to One of Our ICC Profiles by Printing to File
To convert an image with one of our ICC profiles, you need to simulate preparing a print and specify the following parameters in "Print Job":
- Print to: JPEG File
- JPEG Quality: 100
- Custom File Dimensions: use the original dimensions of your image at 300ppi
- Color Management
- Profile: the desired ICC profile
- Rendering Intent: Perceptual
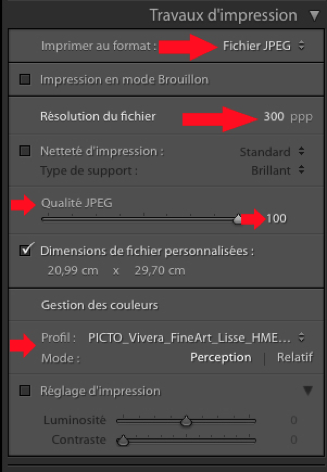
- The conversion and saving of the file are performed by clicking "Print to File..."

Important:
- Adobe Lightroom only supports ICC profiles in RGB.
- Our Black and White profiles are designed to be recognized and managed by Adobe Lightroom.
- We recommend carefully checking the settings of your automated processes in Adobe Lightroom (output image dimensions, resolution, JPEG compression rate) and preferably using Adobe Photoshop for your color corrections and/or conversions.
Manual Conversion in a Mode Other Than Automatic Conversion
This type of conversion is reserved for those who are skilled with ICC and preferably own a calibrated monitor.
You may prefer a different conversion mode than "Perceptual." Certain scenarios require another mode, such as "Relative Colorimetric with Black Point Compensation." This is particularly true when starting from a CMYK file (such as Fogra) and wanting to print in RGB.
There is no absolute or "magic" method in this field, as results depend on your original file's colors and the chosen printing process color gamut. The overlap of these two gamuts and their relative sizes will determine the best approach, sometimes independently of what your screen displays.
In this case, perform the conversion using the rendering intent that seems most appropriate (mode + black point handling) and save your file while embedding the used profile. Printing will follow your rendering intent, overriding Picto Online's "Perceptual" automation, within the limits of your display and chosen process.
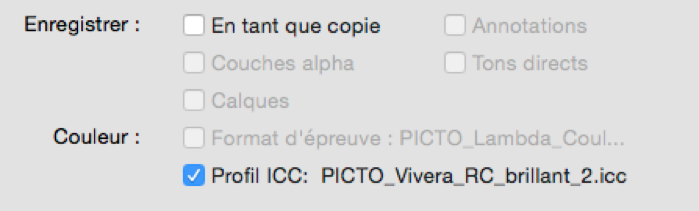
Validate and save your image, ensuring to embed the ICC profile (by checking the ICC Profile box).
 Warning: The file resulting from this conversion is intended only for printing on the defined paper/media and printer.
Viewing Conditions ISO 3664 and ISO 12646: Monitor and Light Table
The accuracy of ICC display simulation depends on your monitor calibration and your lighting setup, which allows you to evaluate the printed photo.
Picto uses calibrated monitors and standardized viewing stations (JUST Normlicht viewing booths and light tables).
Picto complies with ISO 3664:2009 standards for critical viewing conditions for professionals (critical comparison lighting = condition P1). This complements ISO 12646:2008, currently under revision.
The illumination of the critical observation plane must be 2,000 lx (± 500 lx) at a color temperature of 5,000K (± 500K).
The calibrated monitor luminance should be between 80 cd/m² and 160 cd/m².
At Picto, we calibrate our monitors to 120 cd/m² with viewing stations at 2,000 lx.
In typical display or hanging environments, lighting is often closer to 500 lx (± 125 lx), equivalent to office ambient light = condition P2.
This often makes the print appear denser, requiring manual compensation on the file before printing (regardless of the chosen conversion mode).
Usually, brightening midtones helps correct the density difference between screen display and actual print output under P2 lighting. Another solution is to use a monitor with lower luminance (90/100 cd/m²).
To avoid rough adjustments, once you have a test print, simulate its rendering on your monitor by creating and adjusting a "screen curve" as an adjustment layer in Adobe Photoshop.
The goal is to use this adjustment layer to simulate the final real print rendering on your screen.
This curve, saved as an adjustment layer, is only for on-screen visualization and should be enabled when editing the image. It must not be applied to the final print-ready image.
Since this offset is constant, simply apply the correction to each image before preparing it for printing.
We advise ordering a test print of one of your images to calibrate and save your correction.
Link to ISO publications: www.iso.org/iso/fr
ICC Profile Downloads
You can download ICC profiles from each service presentation page by clicking "See More" and then on the button « Download ICC Profile » located in the description of each paper/support.